
Signal-Based Reactivity In Angular (The Future of Change Detection) 📡
Angular 16 Signals is a new feature that allows developers to create reactive and declarative applications with less boilerplate code. In this blog post, I will introduce you to the concept of signals, how they work, and how you can use them to build dynamic and responsive user interfaces.
⚙️ How Angular currently deals with reactive state management
Angular primarily relies on RxJS for reactive programming and offers various techniques for managing state reactively within applications.
Angular Services and RxJS:
BehaviorSubjects and ReplaySubjects: These RxJS subjects are often used within Angular services to create centralized stores. They allow components to subscribe to changes in state and emit new values whenever the state changes. BehaviorSubject retains the current value and emits it immediately upon subscription, while ReplaySubject can emit multiple previous values upon subscription.
Immutable State Management: Techniques like NgRx or Akita facilitate managing state using immutable data structures and unidirectional data flow. These libraries follow Redux-like patterns, utilizing actions, reducers, and selectors for managing application state.
@ngrx/store (NgRx):
Redux Pattern: NgRx is a popular state management library for Angular applications, based on the principles of Redux. It provides a store, actions, reducers, and effects to manage application state in a predictable and reactive way.
Other Reactive Patterns:
AsyncPipe: Angular’s AsyncPipe integrates seamlessly with Observables, allowing the UI to directly subscribe to an Observable in the template. It automatically handles subscription and unsubscription, reducing the need for manual subscription management in component classes.
Reactive Forms: Angular's Reactive Forms utilize Observables to reactively manage and validate form inputs. Form controls are bound to Observables that emit changes, allowing for dynamic and reactive form handling.
Local State Management:
Component State and Inputs/Outputs: Angular components can maintain their state via properties and inputs/outputs. Inputs allow passing data into components, while outputs emit events to communicate changes to parent components.
Angular's approach to state management emphasizes the use of RxJS for reactive programming. Depending on the application's complexity and requirements, developers can choose between simpler reactive techniques using RxJS Observables or opt for more structured state management libraries like NgRx for larger-scale applications with complex state needs.
🚦Why Signals?
Signals are a way of expressing data dependencies and changes in your application logic. They are similar to observables, but with some key differences that make them easier to use and more performant. Signals are based on the idea of reactive programming, which is a paradigm that focuses on data flows and the propagation of changes.
Reactive programming can help you write code that is more readable, maintainable, and testable. Signals are also inspired by the Elm architecture, which is a pattern for building web applications using pure functions and immutable data structures. The Elm architecture promotes a clear separation of concerns between the model, the view, and the update logic of your application. Signals can help you implement this architecture in Angular, and leverage the benefits of functional programming.
"Signals provide a new way for our code to tell our templates (and other code) that our data has changed. This improves Angular's change detection, which also improves performance, and makes our code more reactive."
👨🏫 Let me explain!
Let's start with a simple example without the use of signals. Say you are writing code to perform some basic math operations.
let x = 2;
let y = 3;
let z = x + y;
console.log(z);
This prints out 5 right? Yes!, now assume one of the values get changed.
let x = 2;
let y = 3;
let z = x + y;
console.log(z);
x = 2;
console.log(z);
It still logs 5 right? Because it still holds the value assigned when it got evaluated for the first time. But we want them to react to changes.
With signals, our code can be more reactive. Our prior example implemented with signals would look like this:
const x = signal(2);
const y = signal(3);
const z = computed(() => x() + y());
console.log(z()); // 5
x.set(2);
console.log(z()); // 7
The two signals, x and y, are defined in the code above, and their initial values are set to 2 and 3. The computed signal, z, which is the sum of x and y, is then defined. Signals provide change notifications, so any values computed from the x or y signals will automatically recalculate whenever those signals change. Now, our code is reactive!
Let's go deep!
⤵️ Going Deep!
Let's clone this repository and follow along with me. I will explain all that you should know about signals using 3 example use cases.
1️⃣ Use Case 01: Real-time data synchronization (profile updates)
In here let's talk about component-component communication with a small example; updating profile images. We'll create a small helper service called ProfileUpdateService for this.
import { Injectable, signal } from '@angular/core';
@Injectable({
providedIn: 'root'
})
export class ProfileUpdateService {
imageUrlSignal = signal<string>('https://i.imgur.com/o9fpo46.png');
constructor() { }
updateImage(image: string){
this.imageUrlSignal.set(image);
}
}
Here we have created a signal by the name, imageUrlSignal, with a value. Here the value is just a placeholder image. updateImage() function just calls the set() function on the signal.
⚠️ set() is used to change the value of a writable signal. Also I have created a UI which will take a URL from the user and renders the image on the page (ProfileComponent).

Also there's a navigation bar which also displays the profile picture (NavigationBarComponent). But these two components are not in any way related.
<div class="image-container">
<img [src]="fetchedImageUrl || 'https://i.imgur.com/o9fpo46.png'"
alt="Uploaded Image">
</div>
In the ProfileComponent we have this segment of code, which renders fetchedImageUrl, and if it's not there, we'll show the default image.
export class ProfileComponent {
imageUrl: string = 'https://i.imgur.com/o9fpo46.png'; // Default image URL
fetchedImageUrl: string = ''; // Fetched image URL
isLoading: boolean = false; // Loading indicator
constructor(private http: HttpClient) {}
saveImage() {
this.isLoading = true;
this.http.get(this.imageUrl, { responseType: 'blob' }).pipe(
catchError(() => {
console.error('Error fetching image');
return EMPTY; // Return an empty observable to continue the stream
}),
finalize(() => this.isLoading = false)
).subscribe((response: Blob) => {
const reader = new FileReader();
reader.onloadend = () => {
this.fetchedImageUrl = reader.result as string;
};
reader.readAsDataURL(response);
});
}
}
And in the NavigationBarComponent, we'll don't have a fetched image at all. Only the image URL set to the src attribute.
<img class="profile-picture" src="https://i.imgur.com/o9fpo46.png"
alt="Profile Picture">
<span class="username">John Doe</span>

So at this point, updating one image will not reflect on the Navigation Bar. Let's fix this by utilizing the ProfileUpdateService we created earlier.
export class ProfileComponent implements OnInit{
imageUrl!: string; // Default image URL
fetchedImageUrl: string = ''; // Fetched image
isLoading: boolean = false; // Loading indicator
constructor(
private http: HttpClient,
private profileUpdateService: ProfileUpdateService) {}
ngOnInit(): void {
this.fetchedImageUrl = this.profileUpdateService.imageUrlSignal();
}
saveImage() {
this.isLoading = true;
this.http.get(this.imageUrl, { responseType: 'blob' }).pipe(
catchError(() => {
console.error('Error fetching image');
return EMPTY; // Return an empty observable to continue the stream
}),
finalize(() => this.isLoading = false)
).subscribe((response: Blob) => {
const reader = new FileReader();
reader.onloadend = () => {
this.fetchedImageUrl = reader.result as string;
this.profileUpdateService.updateImage(this.fetchedImageUrl);
};
reader.readAsDataURL(response);
});
}
}
What we have done here is,
- Inject ProfileUpdateService to the component.
- imageUrl default value has been removed from the component (because we have it in the service)
- Implemented ngOnInit and set the fetchedImageUrl to the value of the signal (which is the default image at this point)
- Then called this.profileUpdateService.updateImage(this.fetchedImageUrl); soon after we have a successful image fetched from the URL we have given.
And in the Profile component, a small change.
<div class="image-container">
<img [src]="fetchedImageUrl" alt="Uploaded Image">
</div>
In the NavigationBarComponent we are using effect() to see if value is changed.
export class NavigationBarComponent {
title = 'Angular Signals';
imageUrl!: string;
constructor(public profileUpdateService: ProfileUpdateService) {
effect(() => {
this.imageUrl = profileUpdateService.imageUrlSignal();
});
}
}
⚠️ An effect is an operation that runs whenever one or more signal values change. And in the template,
<img class="profile-picture" src="{{ imageUrl }}" alt="Profile Picture">
<span class="username">John Doe</span>
But also you can do,
<img class="profile-picture" src="{{ profileUpdateService.imageUrlSignal() }}"
alt="Profile Picture">
<span class="username">John Doe</span>
And it will work same as before.

2️⃣ Use Case 02: Working with arrays (shopping carts)
Like earlier let's create a service to share our signal, in this case CartService.
export class CartService {
cartItems = signal<CartItem[]>([]);
constructor() { }
addToCart(item: string): void {
const index = this.cartItems().findIndex(cartItem =>
cartItem.item === item);
if (index === -1) {
// Not already in the cart, so add new item
this.cartItems.update(items => [...items, { item, quantity: 1 }]);
} else {
// Already in the cart, so increase the quantity by 1
this.cartItems.update(items =>
[
...items.slice(0, index),
{ ...items[index], quantity: items[index].quantity + 1 },
...items.slice(index + 1)
]);
}
}
}
export interface CartItem {
item: string;
quantity: number;
}
export interface GroceryItem {
name: string;
}
We only have the addToCart() function for this demo, you can add removeItem() as well. Here, the cartItems is a signal of type CartItem[]
- findIndex Method: Searches for the index of an item in the cartItems array. It looks for an item where the item property matches the provided item.
- If the index is -1, it means the item is not already in the cart. In this case, it adds a new item object to the cartItems array with a default quantity of 1.
- If the index is not -1, it means the item is already in the cart. It increases the quantity of that item by 1.
- When the item is not found (index === -1), it uses this.cartItems.update() to add a new item to the cart. It uses the functional update pattern to ensure immutability by creating a new array ([...items, { item, quantity: 1 }]) containing all existing items (...items) along with a new item object having the specified item and a default quantity of 1.
- If the item already exists (index !== -1), it modifies the existing item's quantity.
- It creates a new array by:
- Taking the items before the found index (...items.slice(0, index)).
- Updating the quantity of the item at the found index ({ ...items[index], quantity: items[index].quantity + 1 }).
- Concatenating the items after the found index (...items.slice(index + 1)).
In the previous example we saw the set() operation on signals, which is used to change the value of a writable signal directly. This time we're using update(), which is used to compute a new value from the previous one.
⚠️ Use the .update() operation to compute a new value from the previous one.
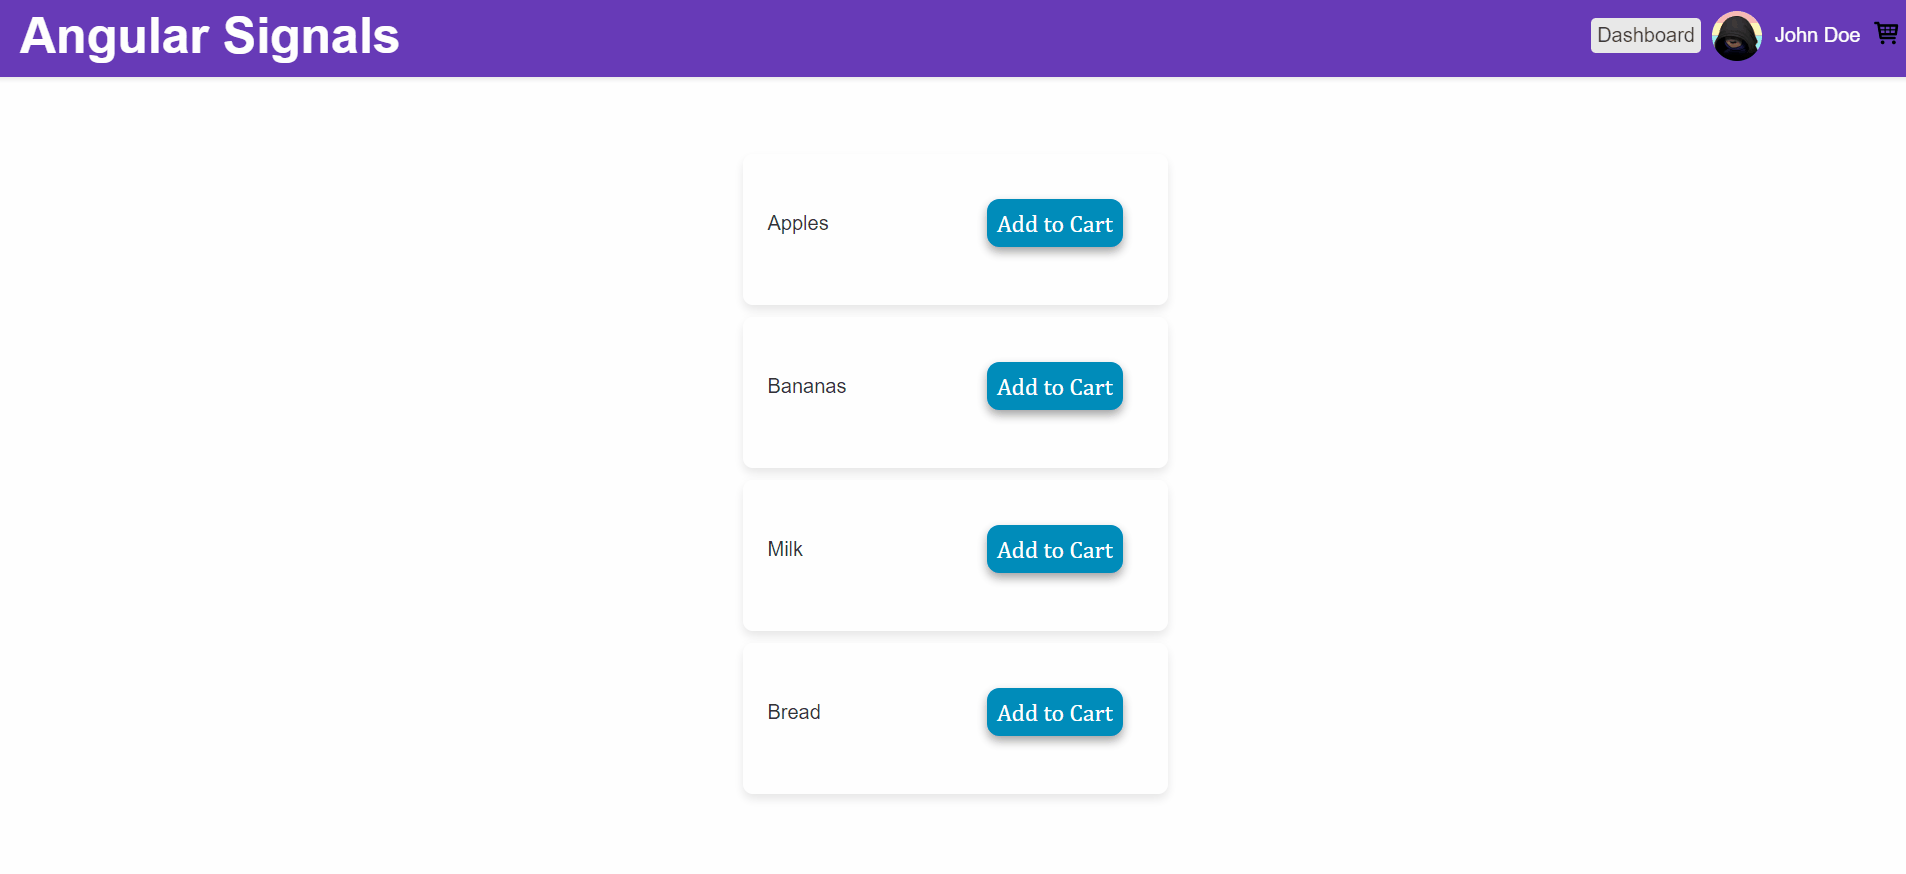
Let's create a component for a shop page, with few grocery items, so that users can add them to cart. (once again I'm not gonna explain the styling /UIs).

And whenever we click on it we'll call a function addToCart()
<button (click)="addToCart(item)" class="add-to-cart-btn">Add to Cart</button>
constructor(private cartService: CartService) { }
addToCart(item: GroceryItem) {
if (item) {
this.cartService.addToCart(item.name);
}
}
In our navbar let's add a Cart icon together with a badge to display the count.

<nav aria-label="nav-item">
<svg baseProfile="tiny" height="24px" version="1.2" viewBox="0 0 24 24"
width="24px" xml:space="preserve" xmlns="http://www.w3.org/2000/svg"
xmlns:xlink="http://www.w3.org/1999/xlink">
<g id="Layer_1"><g><path d="M20.756,5.345C20.565, .........."/>
<circle cx="8.5" cy="19.5" r="1.5"/><circle cx="17.5" cy="19.5" r="1.5"/>
</g></g>
</svg>
<span class="cart-badge"
*ngIf="cartCount()">{{cartCount()}}</span>
</nav>
Here, if we have a value in the cartCount() signal, we'll display it. Let's create this signal now.
export class NavigationBarComponent {
title = 'Angular Signals';
cartCount = computed(() => this.cartService.cartItems().reduce(
(acc, item) => acc + item.quantity, 0));
constructor(
public profileUpdateService: ProfileUpdateService,
private cartService: CartService) {}
}
This time our signal is a computed signal.
⚠️ A computed signal derives its value from other signals. You can define one using computed and specifying a derivation function.
This uses the reduce method on the array of items. The reduce method iterates through each item in the array and accumulates a single value based on a function provided.
- (acc, item) => acc + item.quantity: This is the function used by reduce. It takes two parameters:
- acc: Accumulator - it stores the ongoing result of the calculation.
- item: Each item in the array during iteration.
- acc + item.quantity: This expression adds the quantity of each item to the accumulator (acc). It calculates the total quantity of all items in the cart.
- , 0: This 0 is the initial value for the accumulator. It means the accumulation starts at 0, and the quantities of items will be added to it during the iteration.
Now let's see it in action.
3️⃣ Use Case 03: Angular Template Driven Forms
This is your typical Angular form, with few input fields.

<div class="form-container">
<form #myForm="ngForm" (ngSubmit)="saveChanges(myForm)">
<div class="form-group">
<label for="firstName">First Name:</label>
<input type="text" name="firstName" [ngModel]="firstName" required>
</div>
<div class="form-group">
<label for="lastName">Last Name:</label>
<input type="text" name="lastName" [ngModel]="lastName" required>
</div>
<button type="submit">Save Changes</button>
</form>
</div>
export class FormsComponent implements OnInit {
firstName!: string;
lastName!: string;
constructor() { }
ngOnInit() {
}
saveChanges(form: any) {
if (form.valid) {
// Perform saving changes logic here
console.log('Form submitted:', form.value);
} else {
// Handle form validation errors
console.error('Form is invalid');
}
}
}
Why we want to add signals to this? you might ask. Few advantages are,
- Efficiency and Performance: Signals are lazily evaluated, recalculating only when dependencies change, leading to significant performance improvements in complex forms.
- Readability and Maintainability: Signals provide a clear and concise way to express application logic, making it easier to understand the connections between different parts of the application.
- Flexibility: Signals can be employed for a wide array of form features, including validation, error handling, and data binding.
Now convert this to a signals based form, we need to define firstName and lastName as signals.
<div class="form-container">
<form #myForm="ngForm" (ngSubmit)="saveChanges(myForm)">
<div class="form-group">
<label for="firstName">First Name:</label>
<input type="text" name="firstName" [ngModel]="firstName()"
(ngModelChange)="firstName.set($event)" required>
</div>
<div class="form-group">
<label for="lastName">Last Name:</label>
<input type="text" name="lastName" [ngModel]="lastName()"
(ngModelChange)="lastName.set($event)" required>
</div>
<button type="submit">Save Changes</button>
<span *ngIf="fullName()"> {{ fullName() }} </span>
</form>
</div
>
Note how we have changed [ngModel]="firstName" to [ngModel]="lastName()" (ngModelChange)="lastName.set($event)" and also added a <span> to display the fullName()again a signal.
Changed the ProfileUpdateService a bit to handle fullName update.
export class ProfileUpdateService {
imageUrlSignal = signal<string>('https://i.imgur.com/o9fpo46.png');
fullName = signal<string>('John Doe');
constructor() { }
updateImage(image: string){
this.imageUrlSignal.set(image);
}
updateFullName(name: string){
this.fullName.set(name);
}
}
And the navigation bar to reflect the changes of this signal
<img class="profile-picture" src="{{ profileUpdateService.imageUrlSignal() }}" alt="Profile Picture">
<span class="username"> {{ profileUpdateService.fullName() }} </span>
Finally in the FormsComponent,
export class FormsComponent implements OnInit {
firstName = signal<string>("");
lastName = signal<string>("");
fullName = computed(() => {
return `${this.firstName()} ${this.lastName()}`;
});
constructor(private profileUpdateService: ProfileUpdateService) { }
ngOnInit() {
}
saveChanges(form: any) {
if (form.valid) {
// Perform saving changes logic here
console.log('Form submitted:', form.value);
this.profileUpdateService.updateFullName(this.fullName());
} else {
// Handle form validation errors
console.error('Form is invalid');
}
}
}
You can see that we have firstName, lastName, and fullName (as computed) signals. And when we save changes update the fullName signal inside ProfileUpdateService, so that we can see it from the Navigation Bar.
Let's see it in action.

Follow me on Twitter (X) to keep in touch with new blog posts. Thank you for reading till the end, I will see you in the next one. 😊🙌
Follow @nishan_cw